Siege of Meereen
Fought in 305 AC at the harbor of Meereen, the siege pitted Daenerys Targaryen’s loyalists against a slaver coalition fleet from Yunkai, Astapor, and Volantis — and ended with the Masters’ navy in ashes.
⚡ Quick Answer
The Siege of Meereen was the decisive harbor battle of 305 AC in which the Wise Masters of Yunkai, Astapor, and Volantis broke a fragile truce and sent a coalition fleet to retake Meereen from Daenerys Targaryen. Daenerys returned astride Drogon in the middle of the assault, freed her two remaining dragons, and burned the Masters’ ships at anchor, while the Unsullied, the Second Sons, and a newly sworn Dothraki khalasar broke the landing force on the beach. The result was a total Targaryen victory that ended organized slaver resistance in the region.
What Was the Siege of Meereen?
The Siege of Meereen was the closing battle of Daenerys Targaryen’s long campaign across Slaver’s Bay, fought not within the city’s walls but in the waters and sand just beyond them. By 305 AC, Meereen had already endured years of unrest — Sons of the Harpy insurgents in the streets, a failed evacuation by sea, and a dragonpit uprising at Daznak’s Pit — but it was the arrival of a combined slaver fleet from Yunkai, Astapor, and Volantis that brought the conflict to its final, decisive stage.
The battle sits at the end of the broader Conquest of Slaver’s Bay, the campaign in which Daenerys Targaryen of House Targaryen dismantled the slave trade of Astapor, Yunkai, and Meereen. Tyrion Lannister, acting as her hand in the city during her absence, had negotiated a seven-day truce with the Wise Masters — a truce they shattered the moment they believed her gone for good, choosing instead to land troops and bombard the Great Pyramid with incendiary fire from offshore.
What followed mattered far beyond Meereen’s walls. A slaver victory would have unraveled every gain of the abolition campaign and stranded Daenerys without a base in Essos. Her victory instead secured the city, broke the economic and military power of the Masters for a generation, and freed the fleet and manpower she would need to sail for Westeros. The battlefield itself — the harbor mouth, the open beach south of the Great Pyramid of Meereen, and the anchorage where the slaver ships massed — remains one of the most referenced sites in any modern account of the war.
Siege of Meereen Battle Map
A schematic of the harbor engagement: the Great Pyramid and the Unsullied lines on the landward side, the Masters’ fleet massed in the bay, and the converging strike vectors of dragonfire and Dothraki cavalry that decided the day.
Key Participants in the Siege of Meereen
Commanders, combatants, and forces whose decisions shaped the outcome of the battle.
Daenerys Targaryen
Queen of Meereen, Mother of Dragons House TargaryenReturned to the city astride Drogon mid-battle, freed Rhaegal and Viserion from the catacombs, and personally led the dragons against the Masters’ fleet.
View Character Profile →Tyrion Lannister
Hand of the Queen, Acting Regent House LannisterNegotiated the seven-day truce that bought Meereen time, then managed the city’s defense and the political aftermath once the Masters broke it.
View Character Profile →Grey Worm
Commander of the Unsullied UnsulliedHeld the city’s landward defenses and led the Unsullied counterattack that broke the slaver beachhead before the dragons even arrived.
View Character Profile →Daario Naharis
Captain of the Second Sons Second SonsLed the Second Sons and the newly arrived Dothraki khalasar against the slavers’ flank, cutting off any retreat from the beach.
View Character Profile →Drogon
Dragon, Daenerys’s Mount Targaryen DragonsArrived at the height of the assault and led the aerial counterattack, freeing Rhaegal and Viserion and turning the harbor into a killing ground.
View Character Profile →Missandei
Advisor & Translator to the Queen Naathi, Targaryen CourtCoordinated the city’s defense alongside Tyrion and Grey Worm, relaying orders through the chaos of the bombardment and assault.
View Character Profile →Greizhen mo Ullhor
Wise Master of Astapor Masters’ CoalitionOne of the three Wise Masters who orchestrated the truce-breaking assault, intending to retake the city while Daenerys was believed lost.
View Faction Profile →The Dothraki Khalasar
Cavalry Host, Sworn to the Queen DothrakiThe khalasar Daenerys united in the Dothraki Sea arrived by sea with Daario and the Second Sons, sweeping the beach clear of slaver soldiers.
View Faction Profile →Siege of Meereen: Full Battle Breakdown
The Truce and Its Collapse
With Daenerys missing in the Dothraki Sea and Meereen reeling from the Sons of the Harpy insurgency, Tyrion Lannister brokered a seven-day truce with the Wise Masters of Yunkai, Astapor, and Volantis, buying the city time to stabilize. The Masters used the respite instead to muster a joint fleet, gambling that the dragon queen would not return before they struck. When word reached them that she had vanished, possibly for good, they broke the truce outright and sailed for Meereen’s harbor.
Bombardment of the Great Pyramid
The slaver fleet opened the battle with catapult fire directed at the Great Pyramid itself, setting sections of the city alight and forcing Tyrion, Missandei, and Grey Worm to organize an emergency defense. Unsullied spearmen formed lines along the harbor approach while the Second Sons under Daario Naharis held the flanks, buying time as the Masters began landing soldiers on the beach south of the city walls.
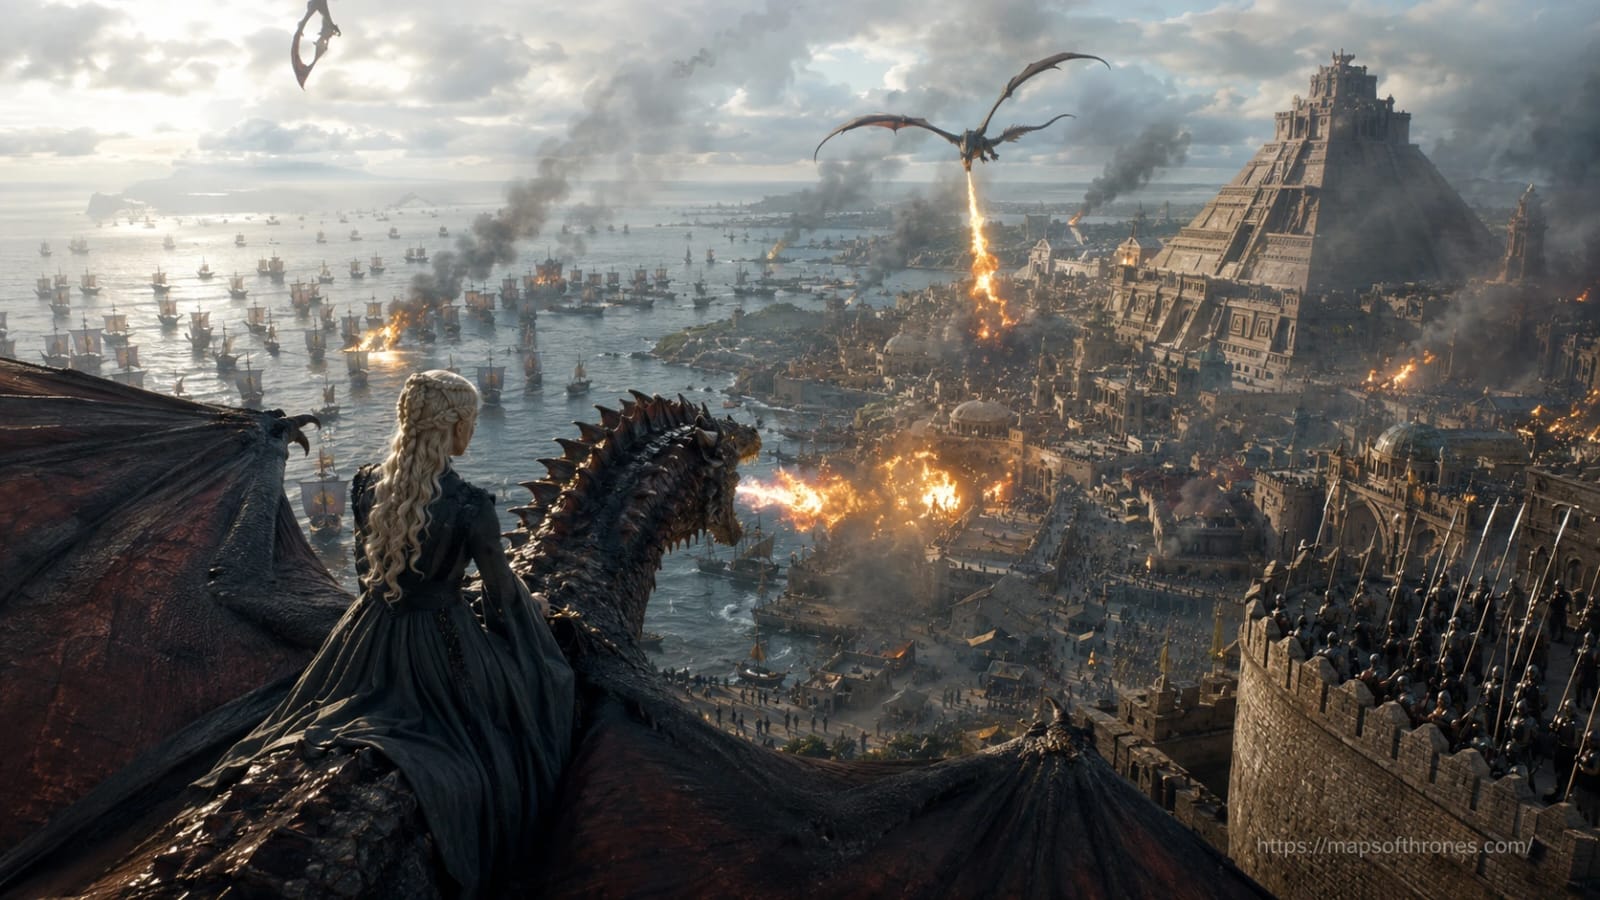
Drogon’s Return
At the height of the assault, Daenerys arrived over the harbor on Drogon, descending into the Great Pyramid’s pit to free Rhaegal and Viserion from the chains that had bound them since the Daznak’s Pit uprising. For the first time since their imprisonment, all three of her dragons took flight together — a sight that broke the morale of the landing force before a single ship had burned.
The Burning of the Fleet
Drogon, Rhaegal, and Viserion swept low over the anchorage, setting ship after ship ablaze while the Dothraki khalasar, ferried in by Daario’s forces, crashed into the slaver soldiers stranded on the beach. Caught between burning ships and a cavalry charge with no line of retreat, the Masters’ army disintegrated within minutes. Grey Worm’s Unsullied closed the trap from the landward side, leaving the coalition force with no avenue of escape.
Surrender of the Masters
With their fleet destroyed and their soldiers dead or scattered, the surviving Wise Masters surrendered to Daenerys directly. She executed the leaders who had broken the truce and spared lesser conspirators as a calculated show of mercy, cementing her control over Meereen and ending any organized slaver threat to the city for the remainder of her time in Essos.
Siege of Meereen Reference Table
A force-by-force breakdown of strength, losses, and objectives during the harbor engagement.
| Force | Commander | Strength | Casualties | Objective | Outcome | Significance |
|---|---|---|---|---|---|---|
| Targaryen Loyalists Unsullied, Second Sons, Dothraki |
Daenerys Targaryen, Grey Worm, Daario Naharis | Several thousand infantry & cavalry, 3 dragons | Minimal | Defend Meereen, destroy the slaver fleet | Decisive victory | Secured Meereen permanently; freed forces for the voyage to Westeros |
| Masters’ Coalition Fleet Yunkai, Astapor, Volantis |
Greizhen mo Ullhor and the Wise Masters | A multi-city war fleet with landing troops | Fleet destroyed, army annihilated | Retake Meereen, restore slavery | Total defeat | End of organized slaver military power in the region |
Frequently Asked Questions About the Siege of Meereen
Who won the Siege of Meereen?
Daenerys Targaryen’s loyalists won decisively. Her Unsullied, Second Sons, and Dothraki forces, backed by all three of her dragons, annihilated the Masters’ coalition fleet outside the harbor and ended the slaver attempt to retake the city.
When did the Siege of Meereen take place?
The siege took place in 305 AC, during the final stage of Daenerys Targaryen’s campaign to secure Slaver’s Bay, shortly after the Wise Masters broke a negotiated truce.
Who fought in the Siege of Meereen?
The battle pitted Daenerys Targaryen’s Unsullied, Second Sons, and a newly sworn Dothraki khalasar against a coalition fleet sent by the Wise Masters of Yunkai, Astapor, and Volantis.
Why did the Masters attack Meereen?
The Masters viewed Daenerys’s abolition of slavery as a direct threat to their economy and tried to retake the city while she was believed gone, breaking the truce Tyrion Lannister had negotiated.
How did Daenerys defeat the slavers’ fleet?
She returned on Drogon at the height of the assault, freed her two remaining dragons from captivity, and burned the Masters’ ships in the harbor while her ground forces broke the landing parties on the beach.
What role did Tyrion Lannister play in the siege?
Tyrion, serving as Daenerys’s hand in Meereen, had negotiated the seven-day truce that delayed the assault, then helped organize the city’s defense and managed the political fallout afterward.
Did all three of Daenerys’s dragons take part in the battle?
Yes. Drogon led the counterattack, and Rhaegal and Viserion, freed from the catacombs beneath the Great Pyramid, joined him to strike the fleet together for the first time since their imprisonment.
What was the outcome for Slaver’s Bay?
The Masters’ fleet was destroyed and their bid to restore slavery collapsed entirely, leaving Meereen secure under Daenerys’s rule and clearing her path to pursue the Iron Throne in Westeros.
Related Battles, Houses & Maps
Legacy of the Siege of Meereen
The Siege of Meereen marked the last serious military challenge to Daenerys Targaryen’s rule in Slaver’s Bay. By breaking the Masters’ coalition fleet in a single engagement, she removed the only force capable of contesting her control of the region, stabilized Meereen under Grey Worm and Missandei’s continued oversight, and freed the Unsullied, the Second Sons, and the Dothraki to commit fully to the voyage west. Few battles in the war did more to determine the shape of the campaign that followed.
Explore the Wars That Forged the Realm
From the harbor fires of Meereen to the fields of the Seven Kingdoms, trace every battle, every house, and every commander on the definitive map of Westeros and Essos.